Chris Ibbott describes a case involving two removable orthodontic systems and direct bonding.
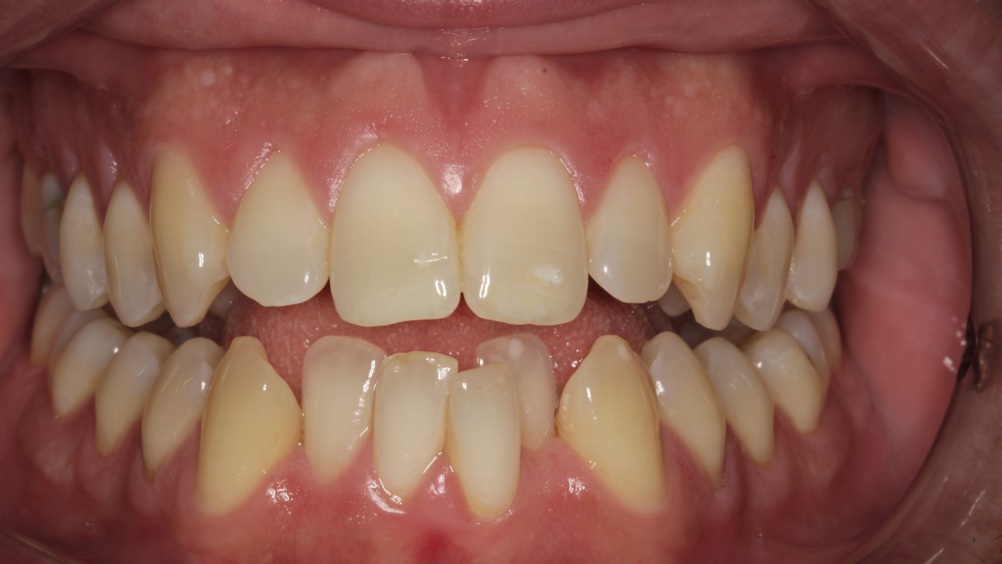
A 29-year-old male patient attended for an initial consultation with concerns about the aesthetics of his dentition. He was not happy with the appearance of his upper four front teeth and, more specifically, his crooked and crowded lower anterior teeth (fig 1).
A full examination was carried out and the appropriate photographs and radiographs were taken. The patient had a class three malocclusion on a class three skeletal base with mild upper and moderate lower anterior crowding (figs 2 and 3). The buccal segment and canine relationships were class three on both sides, with a slightly reduced overjet of 2mm. The overbite was reduced to 1.5mm on the UL1.
The patient’s teeth were generally in very good condition, although a simple posterior restoration was required. Tooth wear was minimal. There was some mild plaque build-up and inflammation, which required therapy from the hygienist prior to commencing orthodontic treatment. There were no temporomandibular joint symptoms and the soft tissues were healthy.
Treatment options
The patient understood that orthodontic treatment would be required to correct the crowding of his lower anterior teeth. He was not prepared to consider fixed appliances, despite being informed that this could provide the best outcome. It would be more straightforward to align the teeth using fixed braces, particularly as there was scope to move the canine teeth and create more space to align the lower incisor teeth. A removable appliance would be a compromise to some extent.
Both clear aligner treatment options using Invisalign and a lower Inman Aligner were considered. Prior to confirming feasibility of an Inman Aligner, upper and lower PVC silicone impressions were taken, using a two-stage putty with a spacer, followed by a light-body impression technique. These were sent to the laboratory and the case was analysed for space requirements. Arch analysis with Spacewize revealed that alignment of the lower teeth with an Inman Aligner was achievable (fig 4), although this might result in a slightly uneven gingival margin at the completion of alignment, particularly on the lower left lateral incisor.
These findings were discussed with the patient. He was informed he would need to wear the appliance for 20 hours a day. The nature and location of interproximal reduction (IPR) was also explained. It was made clear that IPR would be minimised, or become unnecessary, if he chose a fixed appliance, but the patient did not wish to pursue this option. A series of Clear Aligner removable appliances were selected as the treatment option for the upper arch, as only minor alignment was required.
Short-term orthodontics
The case required liaison with two orthodontic laboratories, one in the UK and one in Denmark. The UK laboratory produced diagnostics for the alignment of the upper L2 to R2 and a series of six aligners. At the next appointment, the fit was checked and the patient was given three aligners to wear for 22 hours a day, for seven days each. The process was then repeated for the final three aligners. In the meantime, the Danish laboratory developed the diagnostics and digitally printed model used for fabrication of the Inman Aligner for the lower arch.
At a subsequent visit, the lower arch Inman Aligner was fitted (fig 5). The pre-operative and post-operative models were measured to identify where tooth width changes were necessary, in conjunction with the planned degree and location of IPR (fig 6). These changes were made progressively throughout the treatment. A small composite resin anchor was placed on the disto-lingual surface of the lower left lateral incisor (fig 7). The patient was given instructions to turn the screw in the combined expander by a quarter turn once a week and repeat for 10 weeks.
The patient was seen every three weeks for progressive IPR. The spurs on the lingual surfaces of the lower canine teeth were activated, to give a small amount of expansion of the lower canines (fig 8). In conjunction with the combined expander, this relieved the crowding temporarily and allowed the lower lateral incisors to procline (fig 9). After the lower lateral incisors had moved forward, the metal spurs were bent back out of contact.
Approximately nine weeks after insertion of the Inman Aligner, composite anchors were placed labially on both lower central incisors. The patient was told to turn back the combined expander once a week for five weeks. Four weeks later, the patient was reviewed to assess the alignment, the presence of any residual spacing and the effect of any expansion on the posterior occlusion (figs 10 and 11). No changes in posterior occlusion were noted and there were no interferences. The patient was very happy with the degree of alignment of the lower anterior teeth.
Upper and lower alginate impressions were taken for fabrication of a braided steel retainer wire for the upper arch (fig 12), and for a corrective clear aligner for the lower arch to push back a little further on the lower left central incisor. The patient did not wish to have any further changes made, apart from some minor bonding.
A further set of alginate impressions were taken two weeks later, the patient having worn the lower aligner for two weeks. Upper and lower tooth-whitening trays were constructed. The patient carried out three weeks of home tooth whitening for 35 minutes a day with six per cent hydrogen peroxide Philips Zoom DayWhite gel. Prior to commencement of whitening, standard photographs were taken with shade tabs (fig 13). The pre-whitening shade was Vita A2 and, at the review appointment three weeks later, the final shade achieved was B1. The patient was very pleased with the result. He was advised to continue wearing the removable aligner for the lower arch for 22 hours a day.
Consistent results
At the next appointment, composite resin bonding was carried out to lengthen the upper lateral incisors and to repair the edge of the right central incisor. The edges of both lower central incisors were also restored with composite resin. A mock-up was made on the upper lateral incisors with Kulzer Venus Diamond Flow composite, to help confirm with the patient the degree of length change required (fig 14). The upper anterior teeth were restored by creating a palatal shelf of Venus Diamond Opaque Light Chromatic dentine composite. The labial proportion was restored directly with B1 Venus Diamond composite resin. The incisal edges of the lower central incisors were restored with the same materials (fig 15).
I use Venus Diamond as it provides consistent results, is easy to use, and has an excellent long-lasting polish (fig 16). I avoid any unwanted translucency or grey lines at the junction of the natural tooth with the composite, using a combination of the enamel and dentine shades. I can mould and feather out the material with a composite modelling brush, in order to achieve the required shape.
Following restoration of the lower anterior teeth, a final impression was taken for fabrication of a braided steel retainer wire, which was subsequently bonded in place from 3 to 3 (fig 17). The patient was fitted with removable upper and lower Essix retainers and advised that these must be worn for a minimum of two nights a week.
The patient was extremely pleased with the end result (fig 18) and said, “I am so grateful for the confidence I now have in my smile.” He understood that we were at the limit of what could be achieved with the Inman Aligner. Fixed appliances would have been the most desirable orthodontic treatment. However, as the patient has a client-facing role in the City, this would not have been a convenient option for him.
Fig 1: The patient was not happy Figs 2 and 3: The patient had a class 3 malocclusion on a class 3 skeletal
with the appearance of his upper base with mild upper and moderate lower anterior crowding.
four front teeth and, more
specifically, his crooked and
crowded lower anterior teeth.
Fig 4: Arch analysis with Spacewize revealed that Fig 5: The Inman Aligner was fitted to the
alignment of the lower teeth with an Inman Aligner lower arch.
was achievable.
Fig 6: The pre-operative and post-operative models Fig 7: A small composite resin anchor was placed
were measured to identify where tooth width on the disto-lingual surface of the lower left lateral
changes were necessary. incisor.
Fig 8: The spurs on the lingual surfaces of the Fig 9: In conjunction with the combined expander,
lower canine teeth were activated, to give a this relieved the crowding temporarily and allowed
small amount of expansion of the lower canines. the lower lateral incisors to procline.
Figs 10 and 11: Four weeks later, the patient was reviewed to assess the alignment, the presence of any
residual spacing and the effect of any expansion on the posterior occlusion.
Fig 12: Braided steel retainer wire was fitted to Fig 13: Prior to commencement of whitening,
the upper arch. standard photographs were taken with shade tabs.
Fig 14: A mock-up was made with Kulzer Venus Fig 15: The incisal edges of the lower central incisors
Diamond Flow composite, to help confirm with were restored with the same materials.
the patient the degree of length change required.
Fig 16: Venus Diamond provides consistent Fig 17: A braided steel retainer wire was bonded in
results, is easy to use, and has an excellent place from 3 to 3.
long-lasting polish.
Fig 18: The patient, who works in the City, was
extremely pleased with the end result.