

A 61-year-old female patient presented with a failing, upper 3-3, metal ceramic bridge, connected to the canines and lateral incisors on either side. The bridge had failed with caries and core fractures on both abutment teeth on the patient’s left side. As such, the patient was keen to repair or replace the bridge without the use of a removable prosthesis at any point during treatment.
A comprehensive clinical assessment was conducted to evaluate the potential treatment options. A full suite of clinical photographs was taken to assess the aesthetics, with X-rays to better understand the damage to the remaining teeth. A CT scan was also required to assess the existing bone volume.
Despite using all the available examination tools, it was still challenging to assess the level of damage to the teeth under the metal ceramic bridge, because the prosthetic material obstructed the X-ray. It was confirmed that two teeth were decayed and fractured, but it was not possible to confidently diagnose the UR2.
The assessment findings were discussed with the patient in detail. This included the extraction of the UL2 and 3, which were carious and unrestorable, and the need to assess the UR2 once the bridge had been removed. The patient was informed of the potential solutions depending on the prognosis of the UR2, which included extraction should the tooth be in poor condition.
With regards to the restorative options for this case, taking the patient’s preference for a fixed restoration into consideration, treatment would involve an implant-retained prosthesis. All the potential benefits, limitations and risks were explored with the patient and she was comfortable to give informed consent.

Fig 1. Presenting smile.
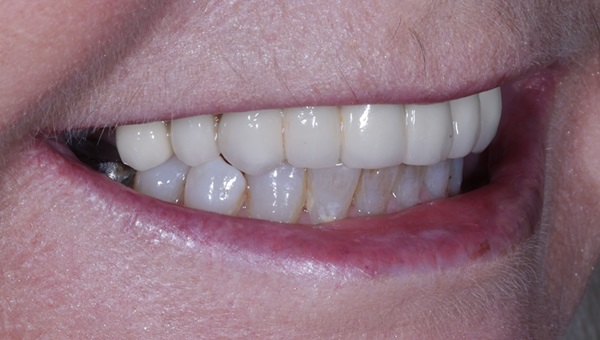
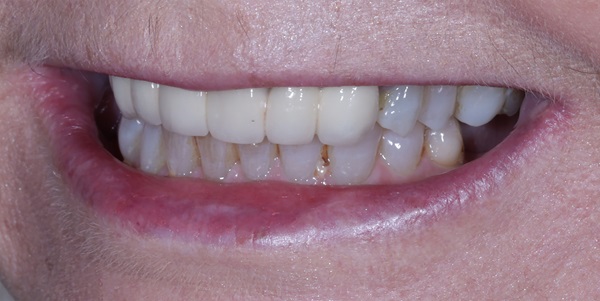
Fig 3. Smile left lateral view.
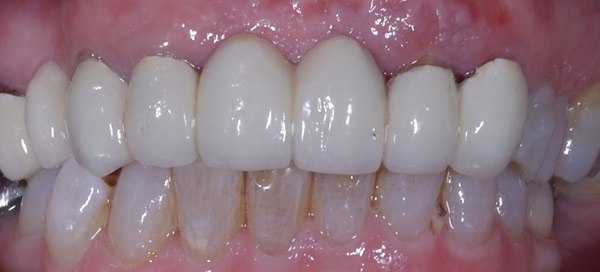
Fig 4. Presenting smile retracted view.
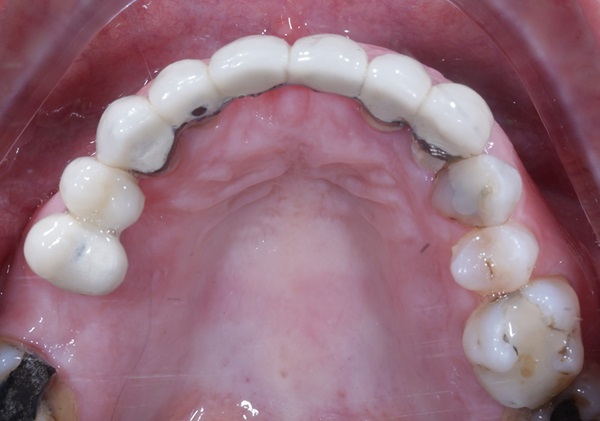
Fig 5. Upper occlusal view.
Planning
This case would be treated using a guided approach. With a greater number of implants placed, the appreciation for guided surgery has grown due to the benefits it provides. This technique helps to mitigate the potential for human error on the day of surgery, resulting in a more predictable treatment process. The literature demonstrates the increased accuracy of implant placement made possible with a fully guided technique compared to freehand surgery.
Guided surgery requires more preparatory work to be completed in the background, but this effort is worthwhile for the streamlined surgical treatment on the day of the procedure. Guided surgery is particularly ideal for immediate implant placement in fresh sockets, especially when immediate loading is planned. This approach facilitates a smoother transition from implant placement to connecting the temporary restoration. Research supports this concept; however, factors such as clinician experience and guide fabrication methods should be optimised to achieve the best outcomes.
Having identified the UL3 as needing extraction, this provided an ideal site for immediate implant placement. The existing root was large with limited bone available around it, so it was crucial to ensure appropriate implant selection and precise placement for good stability.
Bone grafting was also strongly indicated at this site. Whenever extracting a tooth, regardless of how atraumatic the process is designed to be, there is always the potential for bone and soft tissue loss. Both hard and soft tissue augmentation is an absolute requirement with every immediate implant placed into a fresh extraction socket. The science shows that bone augmentation into the buccal void between the socket and immediately placed implant surface can help to preserve volume of the alveolar ridge.
There is also evidence that bone and soft tissue grafting around an immediate implant can increase bone stability, prevent gingival recession and improve aesthetic results. This was pertinent in this particular case, where the surgical sites required grafting to minimise the hard and soft tissue changes that would take place post-surgery, maximising stability and aesthetics.
For the second implant, both central incisor sites would have been suitable, but the UR1 location was selected as an ideal position to support a 4-unit bridge. Questions remained over the UR2, so preparations were made for different situations. If the tooth was found to have a poor prognosis upon assessment, a cantilever could be created on the bridge to the UR3.
Digital tools were used to plan treatment, including the precise implant positions, angulations and depths.
The new Tapered Pro Conical implants (BioHorizons Camlog) were selected for this case for several reasons. These implants integrate the best features of BioHorizons’ Tapered Pro and Camlog’s Conelog Progressive-Line implants. The conical connection of the Tapered Pro Conical implants boasts a 13-year heritage and has demonstrated evidence of high-precision manufacturing and superior positional stability compared to other conical connections. This new conical connection provides confidence that an optimal emergence profile will be achieved with the restoration, which is crucial when working in the aesthetic zone. The 3.3mm diameter implants were chosen; while wider implants are generally preferred, this case required a balance between utilising the available bone and adhering to natural structures, necessitating the use of narrower implants.
All the scans, planning software images and photos were sent to our lab partner – Guider Dental – for the fabrication of the guides, which is their specialist area.
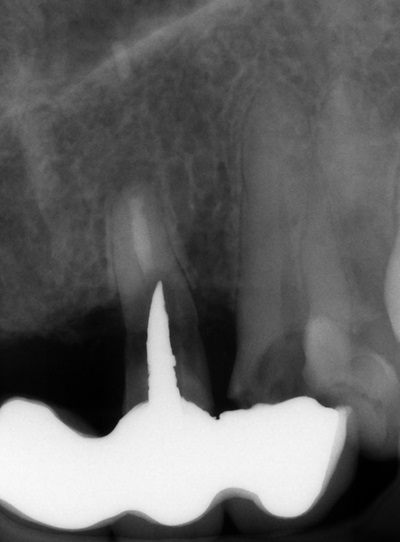
Fig 6. Radiograph of the UL2 and 3.
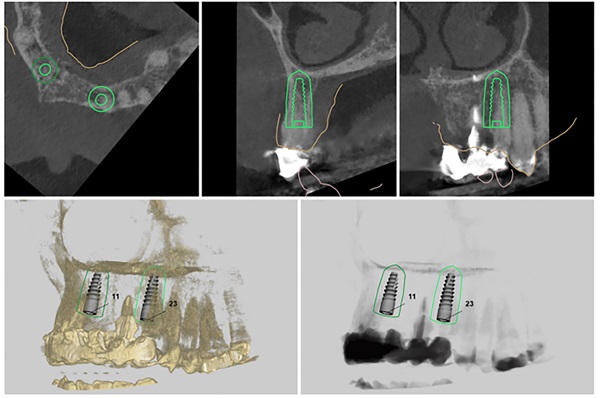
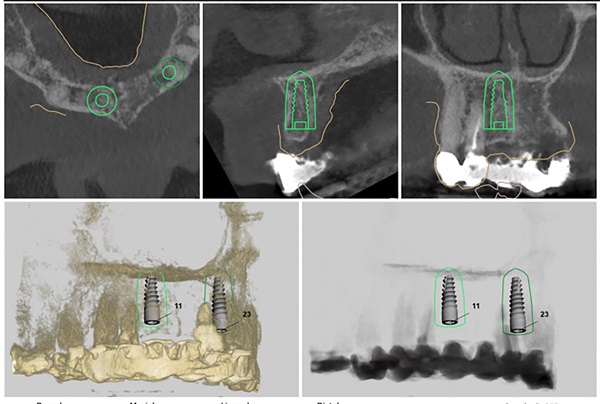
Fig 8. Digital planning for implant placement at UR1 site.
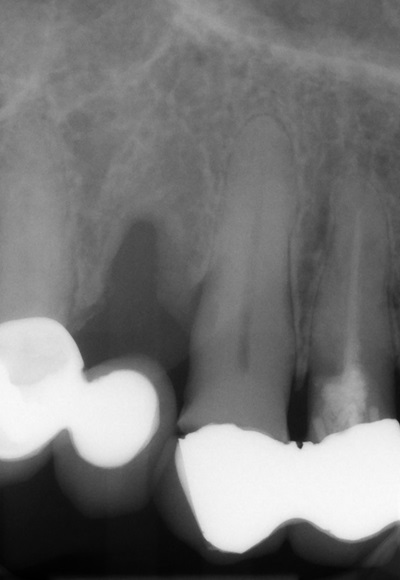
Fig 9. Radiograph of UR1 and 2.
Surgical intervention
On the day of surgery, the first step was to carefully dismantle the bridge while avoiding any damage to the teeth we wanted to keep on the right-hand side. The prosthesis was sectioned and removed in several pieces.
The UR2 was assessed and deemed unrestorable. The UR2, UL2 and 3 were then extracted as minimally traumatically as possible.
A miniflap was raised in the upper central region for this case to enhance visualisation for implant placement and augmentation. The guide was placed in the mouth and the standard guided surgery drilling protocols were followed. The new surgical kit improves workflow and intraoperative efficiency with the removal of spoons and a guide adaptor allowing for both guided and freehand use. During this step of the procedure, the guide was temporarily removed to double check the drilling angulation and verify this lined up with the prefabricated temporary bridge.
The two 3.3mm diameter Tapered Pro Conical implants were then placed through the guide at the predetermined positions, angles and depths. Both implants achieved an insertion torque above 30Ncm.
Bone grafting was then performed, placing MinerOss X (BioHorizons Camlog) into the extraction sockets and the jump gap around the implant in the UL3 socket, to preserve the existing bone of the socket. This would help to minimise changes in the bone post-surgery and help to maintain the buccal profile of the ridge. The biomaterial is a bovine bone mineral matrix that has been proven to increase vertical bone height alongside implant placement. It has worked very well in my cases to date, offering a high turnover to bone for maximum stability and efficient results with immediate implant protocols.
A soft tissue graft was then performed, harvesting connective tissue from the palate and placing it in the sulcus of the UL3.
Non-engaging cylinders were placed onto the implants to connect to the pre-fabricated temporary bridge. A premade temporary bridge was connected, contoured and polished, with particular attention paid to the contour of the restoration and suturing with the aim of prosthetically guided soft tissue healing.
Standard post-operative instructions were provided to the patient, including appropriate adjustments to diet and oral hygiene in the short-term.
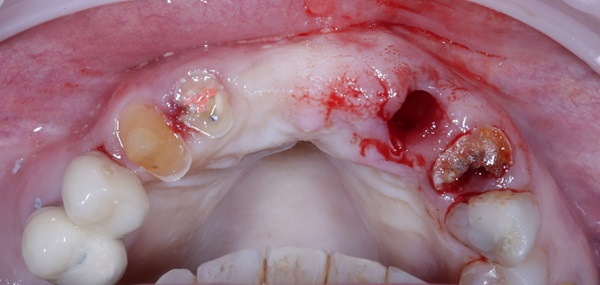
Fig 10. Atraumatic extraction of the failing teeth.
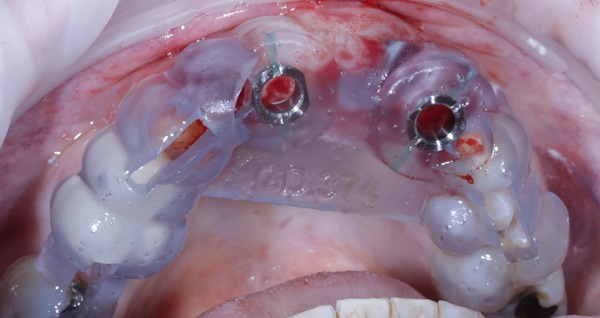
Fig 11. Surgical guide in place.
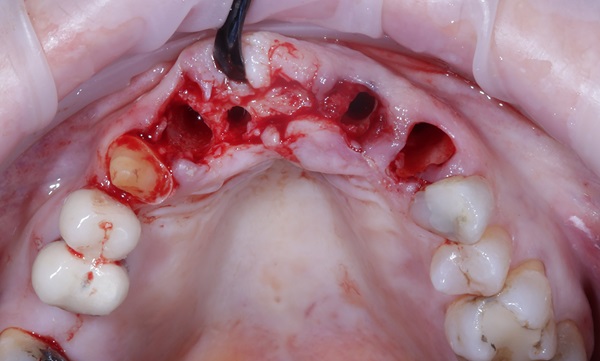
Fig 12. Miniflap raised.
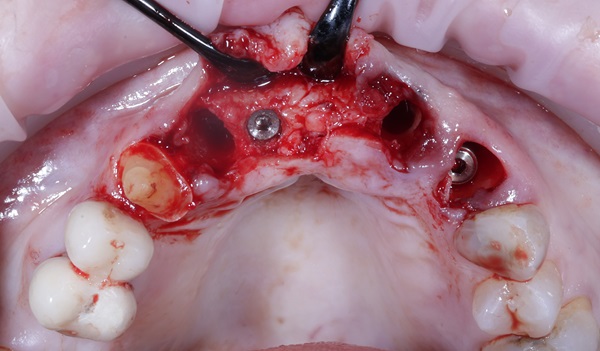
Fig 13. Implants placed at UR1 and UR3 as per the digital plan.
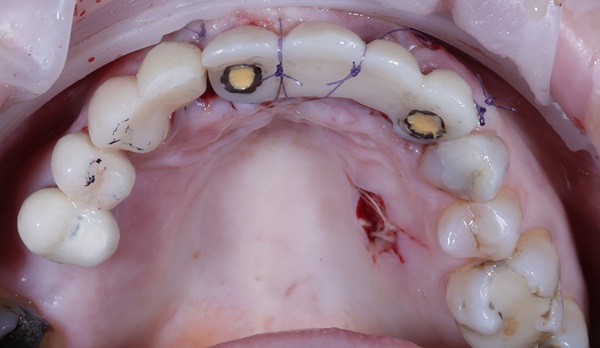
Fig 14. Occlusal view of temporary restorations.
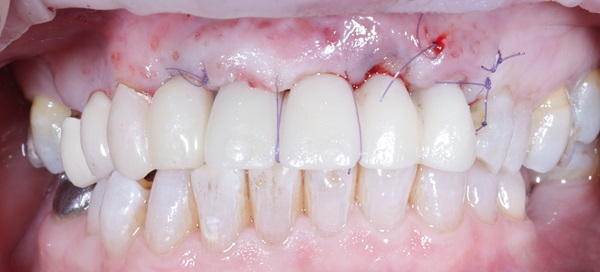
Fig 15. Soft tissue sutured closed without tension and temporary bridge in place.
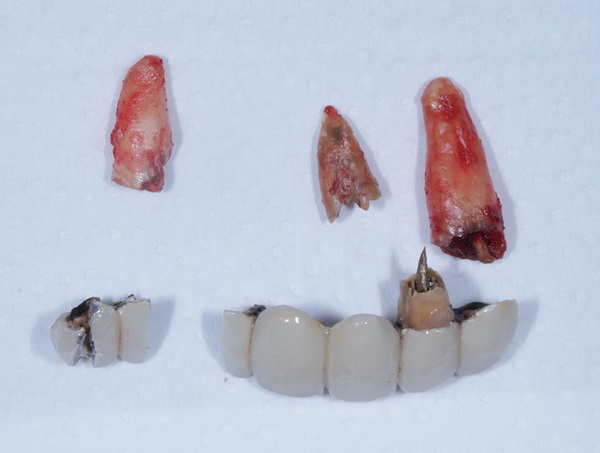
Fig 16. Failing tooth roots and bridge removed.
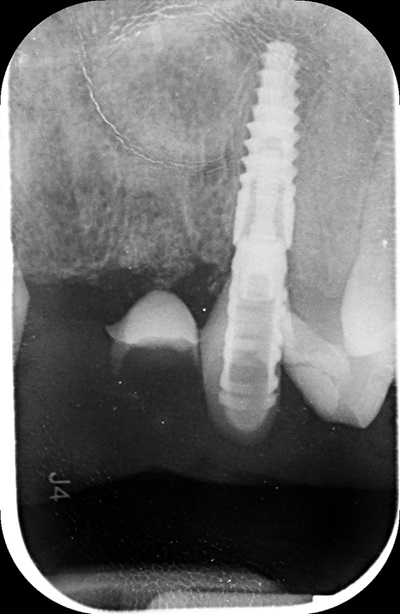
Fig 17. Post-operative radiograph of implant at the UL3 site.
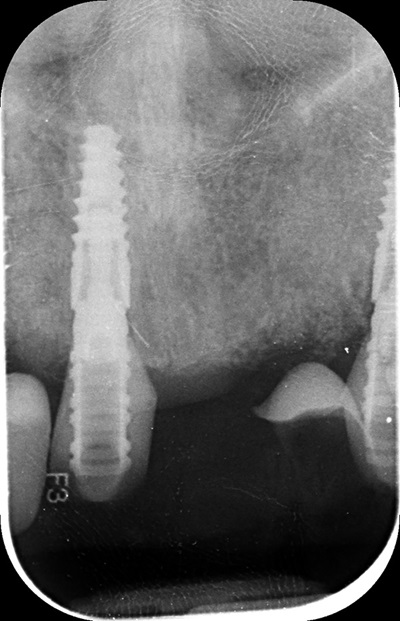
Fig 18. Post-operative radiograph of implant showing implant at the UR1 site.
Review and reflection
The patient returned to the practice for review two weeks post-surgery and to confirm successful and otherwise uneventful healing. Discomfort was minimal and she reported being very satisfied with the outcome. After a healing period of three months, the patient returned to begin making the final prosthesis. Good soft tissue adaptation was noted around the temporary prosthesis and the buccal contour was successfully maintained.
Upon professional reflection, this case went according to plan, emphasising the importance of meticulous assessment and preparation prior to implant surgery. The guided approach helped to ensure the precise positioning of the implants which facilitated connecting the temporary bridge. This, alongside the implant selection, was crucial for maximising on the limited bone available for primary stability.
The Tapered Pro Conical implant from BioHorizons Camlog is a game-changer, offering a new narrow diameter option for enhanced versatility in areas with limited bone. Its conical connection improves the implant-prosthetic interface and emergence profile, delivering optimal aesthetics, while the titanium alloy (Ti-6AL-4V ELI) delivers exceptional strength. It is indicated for use in the mandible and maxilla, single tooth replacements, fixed bridgework, and overdentures. With high insertion torque limits of up to 136 Ncm, the Tapered Pro Conical implant also ensures stability and success in a range of clinical scenarios.

Fig 19. Three months post-operative review shows good soft tissue.
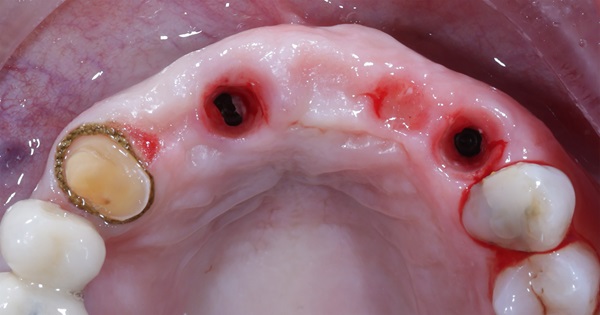
Fig 20. Temporary prosthesis removed at 3 months post-operative.
References available on request.
For more information visit https://theimplanthub.com/